ESP32 MicroPython Based Web Server
In this ESP32 MicroPython based web server tutorial, we use MakePython ESP32 to interface the DS18B20 waterproof Temperature sensor, and read the temperature.
1. Overview: ESP32 MicroPython Web Server
In this article, we are going to learn about ESP32 MicroPython Based Web Server. We will interface the DS18B20 waterproof temperature sensor with ESP32 & read the temperature. We will then create a web server & send the DS18B20 temperature data to the web server. Using the IP address we will monitor the sensor data on the webpage. You can access the sensor data on your local network.
But before beginning, I will highly recommend you to follow the following tutorial to boost up your MicroPython skill. I have explained how you can install MicroPython & use uPyCraft IDE. Similarly, I have also explained how you can interface the DS18B20 temperature sensor with ESP32 using MicroPython code.
(1) MicroPython ESP32 Tutorial - Getting Started
(2) MicroPython ESP32 Tutorial - Interfacing DS18B20
(1) MicroPython ESP32 Tutorial - Getting Started
(2) MicroPython ESP32 Tutorial - Interfacing DS18B20
2. MakePython ESP32
In this case, I am using a MakePython ESP32 Board as this board is cheaper with an additional 1.3″ OLED display and is specially designed for Python support. With 2 versions for choose, WROOM(No PSRAM) and WROVER((8MB PSRAM).
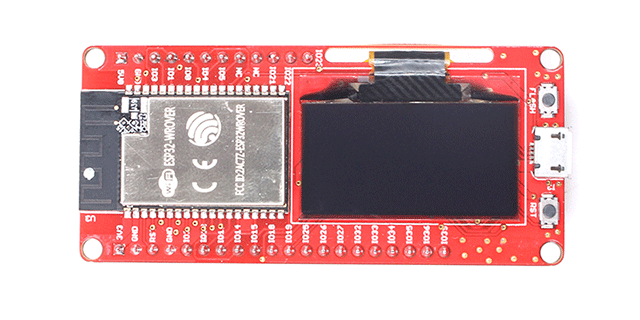
To learn more about this board and purchase it online, you can visit this link on Makerfabs: MakePython ESP32 Board.
3. What is a Web Server?
A Web Server is server software dedicated to run the software, that can satisfy client requests on the worldwide web. A web server may contain one or more websites. A web server processes incoming network requests over HTTP and several other related protocols.
The primary function of a web server is to store, process, and deliver web pages to clients. The communication between client and server takes place using the Hypertext Transfer Protocol (HTTP). Pages delivered are most frequently HTML documents, which may include images, style sheets, and scripts in addition to the text content.
A user agent, commonly a web browser or web crawler, initiates communication by making a request for a specific resource using HTTP and the server responds with the content of that resource or an error message if unable to do so.
You can check the following tutorial to learn more about the ESP32 web server: ESP32 Weather Station on Web Server.
4. Circuit Diagram & Connections
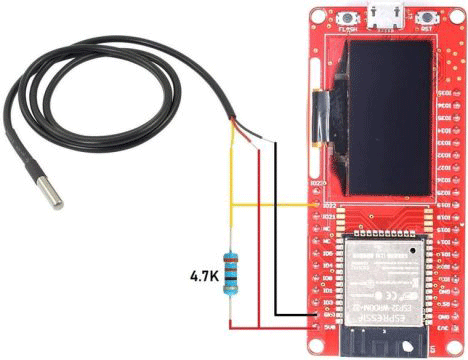
Here is a circuit diagram for Interfacing DS18B20 temperature sensor with ESP32 using MicroPython code. The digital output pin is connected to the ESP32 GPIO22 pin. A 4.7K resistor is used as a pull-up resistor and is connected between the digital output pin & VCC pin. If you want to learn more about the DS18B20 temperature sensor you can follow this post: Interfacing DS18B20 Temperature Sensor with ESP32.
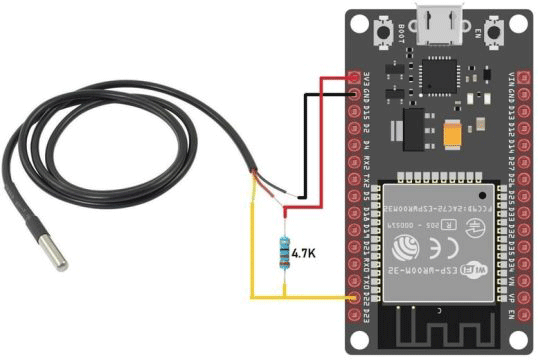
In case if you are using MakePython ESP32 Board, you can do the following connection as shown in the connection diagram below.
5. MicroPython Code/Program
Now let us check the ESP32 MicroPython code for creating a web server. The code contains two parts.
(1) boot.py
(2) main.py
(2) main.py
The boot.py runs after the device starts and immediately sets up multiple configuration options like your network credentials, importing libraries. Similarly, main.py executes immediately after boot.py. It is the main script where we’ll handle the webserver.
5.1 boot.py Code
Create a new file in the uPyCraft IDE and save it as boot.py. Then copy the following code and upload it to the ESP32 board.
try:
  import usocket as socket
except:
  import socket

from time import sleep
from machine import Pin
import onewire, ds18x20

import network

import esp
esp.osdebug(None)

import gc
gc.collect()

ds_pin = Pin(22)
ds_sensor = ds18x20.DS18X20(onewire.OneWire(ds_pin))

ssid = 'Alexahome'
password = 'loranthus'

station = network.WLAN(network.STA_IF)

station.active(True)
station.connect(ssid, password)

while station.isconnected() == False:
  pass

print('Connection successful')
print(station.ifconfig())
5.2 main.py Code
Create another file in the uPyCraft IDE and save it as main.py. Then copy the following code and upload it to the ESP32 board.
def read_ds_sensor():
roms = ds_sensor.scan()
print('Found DS devices: ', roms)
print('Temperatures: ')
ds_sensor.convert_temp()
for rom in roms:
temp = ds_sensor.read_temp(rom)
if isinstance(temp, float):
msg = round(temp, 2)
print(temp, end=' ')
print('Valid temperature')
return msg
return b'0.0'
def web_page():
temp = read_ds_sensor()
html = """<!DOCTYPE HTML><html><head>
<meta name="viewport" content="width=device-width, initial-scale=1">
<link rel="stylesheet" href="https://use.fontawesome.com/releases/v5.7.2/css/all.css" integrity="sha384-fnmOCqbTlWIlj8LyTjo7mOUStjsKC4pOpQbqyi7RrhN7udi9RwhKkMHpvLbHG9Sr" crossorigin="anonymous">
<style> html { font-family: Arial; display: inline-block; margin: 0px auto; text-align: center; }
h2 { font-size: 3.0rem; } p { font-size: 3.0rem; } .units { font-size: 1.2rem; }
.ds-labels{ font-size: 1.5rem; vertical-align:middle; padding-bottom: 15px; }
</style></head><body><h2>ESP32 DS18B20 WebServer</h2>
<p><i class="fas fa-thermometer-half" style="color:#059e8a;"></i>
<span class="ds-labels">Temperature</span>
<span id="temperature">""" + str(temp) + """</span>
<sup class="units">°C</sup>
</p>
<p><i class="fas fa-thermometer-half" style="color:#059e8a;"></i>
<span class="ds-labels">Temperature</span>
<span id="temperature">""" + str(round(temp * (9/5) + 32.0, 2)) + """</span>
<sup class="units">°F</sup>
</p></body></html>"""
return html
s = socket.socket(socket.AF_INET, socket.SOCK_STREAM)
s.bind(('', 80))
s.listen(5)
while True:
try:
if gc.mem_free() < 102000:
gc.collect()
conn, addr = s.accept()
conn.settimeout(3.0)
print('Got a connection from %s' % str(addr))
request = conn.recv(1024)
conn.settimeout(None)
request = str(request)
print('Content = %s' % request)
response = web_page()
conn.send('HTTP/1.1 200 OK\n')
conn.send('Content-Type: text/html\n')
conn.send('Connection: close\n\n')
conn.sendall(response)
conn.close()
except OSError as e:
conn.close()
print('Connection closed')
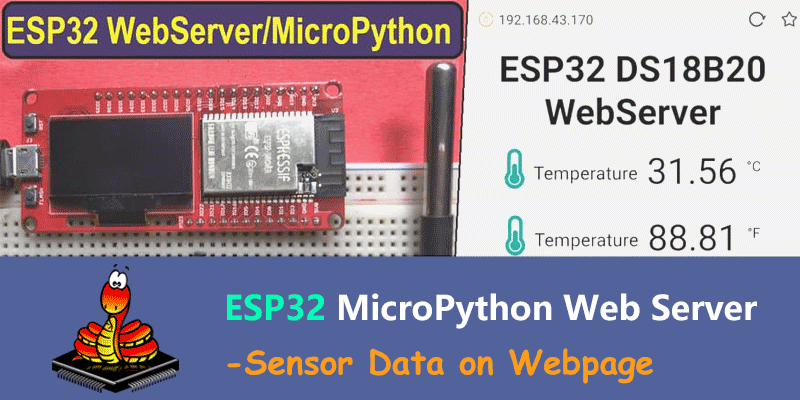
6. Monitor Sensor Data on ESP32 MicroPython Web Server
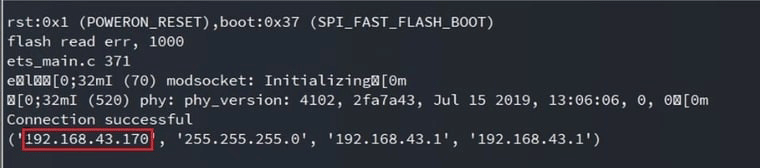
After uploading both the code, press the "Reset Button" on ESP32 board. The ESP32 will now try connecting to the network using the network credentials. Once connected it will show the IP address in shell window.
You can copy the IP Address and go to any web browser and paste it there. You will see the DS18B20 Sensor Data displayed on Web Page.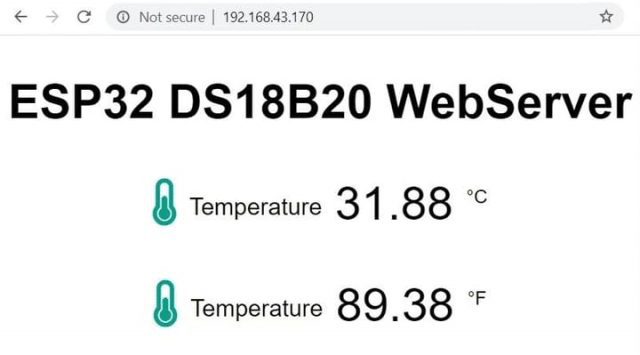

You can copy the IP Address and go to any web browser and paste it there. You will see the DS18B20 Sensor Data displayed on Web Page.

This article is originally posted on How2electronics.
You can also learn from this video tutorial made by How2electronics: