How to Program ESP32 LoRa Gateway with Arduino
In my previous project, I had show you how to monitor the soil moisture with lora, and used the ESP32-Lora to be a lora gateway, which was programming by Micropython. It is not friendly for Arduino users.
You can see the previoues project via this video:
This time, I will tell How to Program ESP32 LoRa Gateway with Arduino, to monitor the soil moisture by using the MakePyrhon ESP32 Lora Gateway and Lora Soil Moisture Sensor.
1. Soil Moisture
Soil moisture is one of the important components of Soil. It is not only an indispensable survival factor for vegetation life, but also forms soil solution together with soluble salts, which becomes the medium supplying nutrients to plants. So that monitoring the soil moisture become more necessary for farm, garden.2. ESP32 Lora Gateway
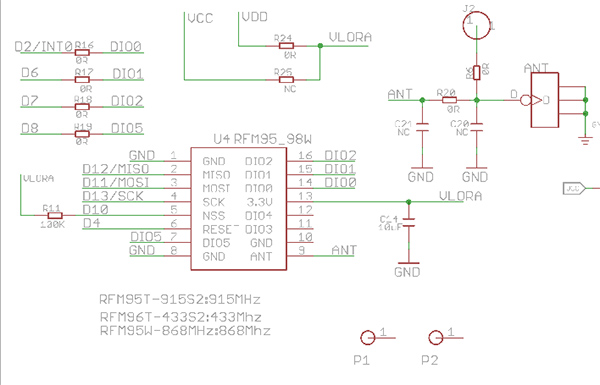
This Lora Gateway is a combination by MakePython ESP32 and MakePython LoRa. ESP32 is a very popular MCU for Arduino or MicroPython. MakePython ESP32 base on the ESP32 and display, it is designed to make it easy for developing, that you can program it just plug the USB cable.MakePython LoRa is two channel LoRa expansion for MakePython ESP32. It provides a solution about LoRa to WIFI that ESP32 connect to LoRa module with SPI. The schematic is shown as the picture:
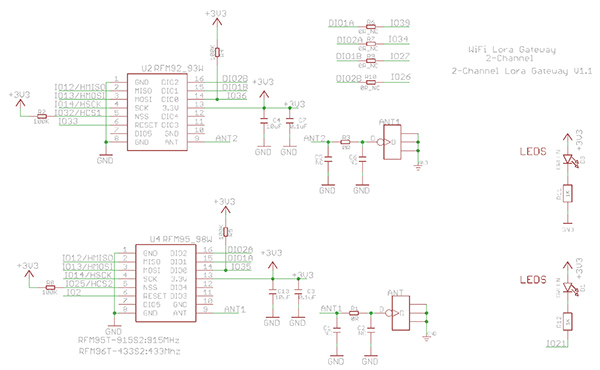
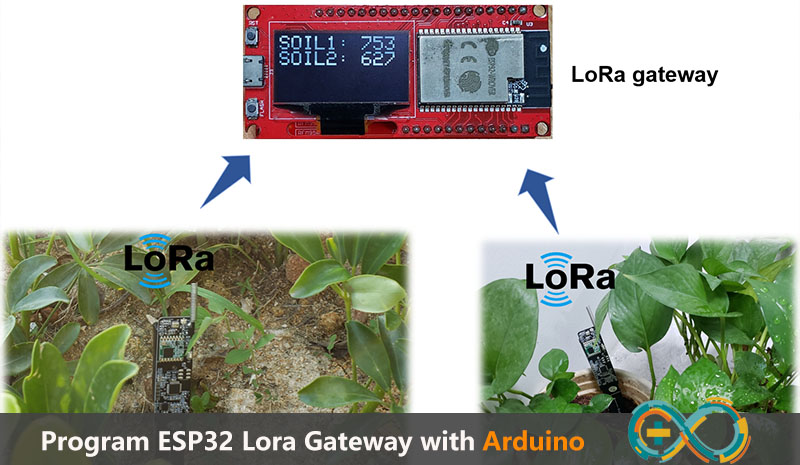
There are two LoRa module on board, in this project, one module named U2 was used to receive the data. LoRa module connected to ESP32 with SPI and GPIOs, as the picture.
ESP32 -------> U2 LoRa module
IO12 ------> MISO
IO13 ------> MOSI
IO14 ------> SCK
IO32 ------> NSS
IO33 ------> RESET
IO36 ------> DIO0
IO27 ------> DIO1
Next, let's program the ESP32 to driver the U2 LoRa module to receive something.
3. Coding to ESP32
1. Config the interface of the LoRa module referring the schematic.#define DIO0 36 #define DIO1 27 #define LORA_RST 33 #define LORA_CS 32 #define SPI_MOSI 13 #define SPI_MISO 12 #define SPI_SCK 142. Install the LoRa library—RadioLib.h to support the LoRa module working.
3. Receive the data transmitted by the other module.
String str;
int state = radio.receive(str);
4. For recognizing the data of which soil module transmitted, every transmitted data would be included the sign such as "SOIL1".
Serial.println(str);

        if(str.indexOf("SOIL1")>-1)
        {   sensorADC = str.substring(str.indexOf("ADC:")+4,str.indexOf("ADC:")+7);

            ADCvalue[0] =  sensorADC;
            Serial.println("1: "+ADCvalue[0]);
            }

        if(str.indexOf("SOIL2")>-1)
        {   sensorADC = str.substring(str.indexOf("ADC:")+4,str.indexOf("ADC:")+7);

            ADCvalue[1] =  sensorADC;
            Serial.println("2: "+ADCvalue[1]);

            }
5. Display the data on the SSD1306 which have featured in the ESP32 board.
      display.clearDisplay();
      display.setTextSize(2);
      display.setTextColor(SSD1306_WHITE);
      display.setCursor(0, 0);
      display.print(F("SOIL1: "));
      display.println(ADCvalue[0]);
      display.print(F("SOIL2: "));
      display.println(ADCvalue[1]);
      display.display();
6. The code can be obtained from the Makerfabs Github.
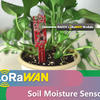
4. Soil Moisture Sensor
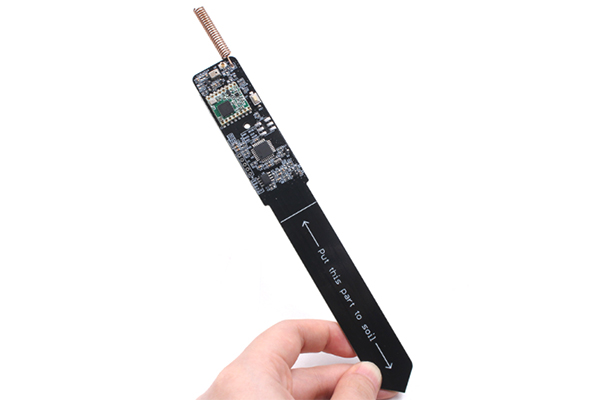
The LoRa soil moisture sensor is based on Atmel's Atmega328P, it collects local air temperature/ humidity with sensor AHT10, and detect the soil humidity with capacitor-humility measurement solution with 555. The sensor transmit the reading data to the gateway with LoRa communication. And it is very suitable to use to remind if the plants in a garden need watering.
The LoRa module also connect to Atmega328P with SPI and GPIO, the connection detail as the below:
Atmega328P ------> Lora module
D12 ----> MISO
D11 ------> MISO
D13 ------> SCK
D10 ------> NSS
D4 ------> RESET
D2 ------> DIO0
D6 ----> DIO1
5. Coding to Soil Moisture Sensor
1. For connecting to the gateway successfully, it was necessary to use the same library to drive the LoRa module.2. When the LoRa transmitted the data, add the sign to the transmitted information for ESP32 to recognize it.
String message = "#"+(String)packetnum+" Humidity:"+(String)humidity+"% Temperature:"+(String)temperature+"C"+" ADC:"+(String)sensorValue+" SOIL2";
  Serial.println(message);
  packetnum++;
  Serial.println("Transmit: Sending to rf95_server");
    int state = radio.transmit(message);
3. You can get the code from Makerfabs Github.
6. Test
Power each module respectively, and the LCD would show the sensor reading.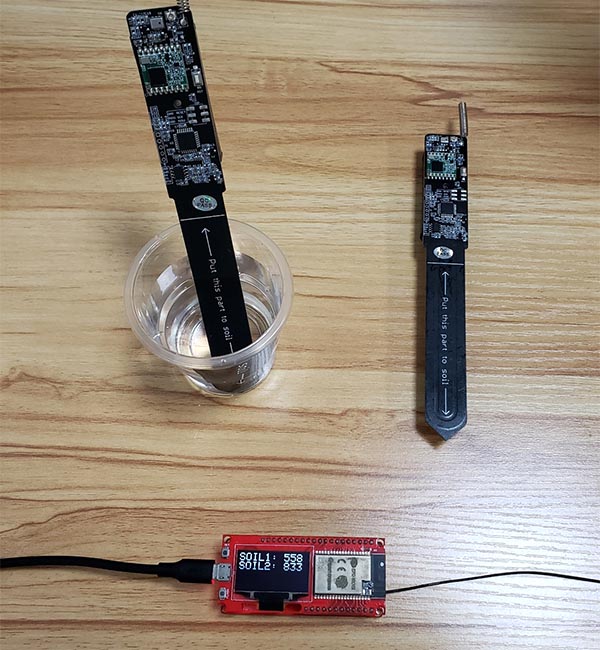
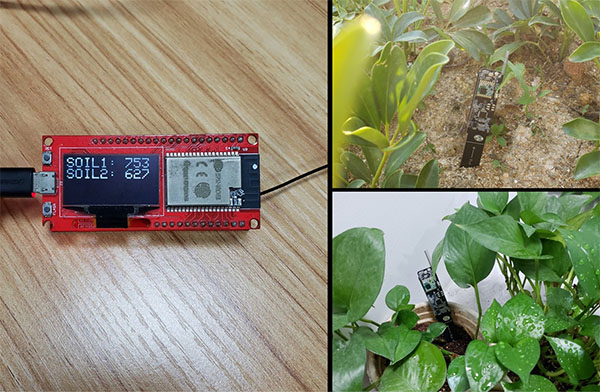
ESP32 can transmit the data received by LoRa module to the website via wifi, such as the Thinkspeak. It also can transmit the data or commands to the other LoRa or LoRa-Relay module via LoRa.
If you have further questions for this tutorial about How to Program ESP32 LoRa Gateway with Arduino, or need Turnkey PCBA service, pls contact service@makerfabs.com.