MicroPython ESP32 Tutorial - Interfacing DS18B20
In this MicroPython ESP32 Tutorial, we will interface DS18B20 with ESP32 using MicroPython Code. Using DS18B20 1-Wire Waterproof Temperature Sensor & MakePython ESP32.
1. Overview: MicroPython on ESP32 with DS18B20 Temperature Sensor
In this project, we will be interfacing DS18B20 Temperature Sensor with ESP32 using MicroPython Code. We will use DS18B20 1-Wire Waterproof Temperature Sensor with ESP32 Board & 0.96″ I2C OLED Display. We will then write a MicroPython Code in uPyCraft IDE. Using the uPyCraft IDE, we can directly upload the firmware to ESP32 Board.
DS18B20 1-Wire Temperature Sensor can be programmed easily to get the correct reading. The accuracy of the sensor is high and can be used to measure the temperature between -55°C to 125°C.
Before proceeding, you can check this Guide: MicroPython on ESP32 using PyCraft IDE - Getting Started. I highly recommend you follow this guide as it covers all the basics including setting up the IDE to writing the code & uploading as well.
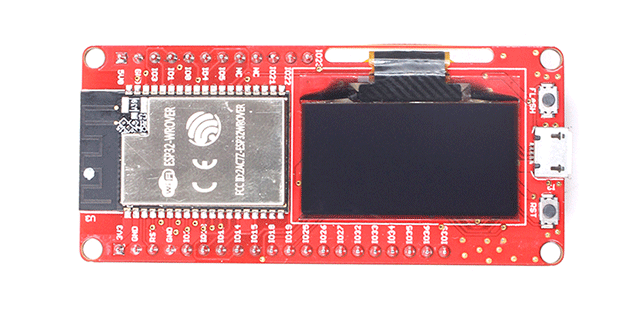
2. MakePython ESP32 Develop Board
MakePython ESP32 is a development board designed by Makerfabs, a powerful, generic Wifi+ BLE MCU module target to MicroPython learners & developers. This board contains combined ESP32 Chip + 1.3" I2C OLED Display supports MicroPython. It is true "breadboard compatible", with the very detailed pins explanation, it is easy to learn& use. The MakePython ESP32 has 2 optional for users: WROOM(NO PSRAM) and WROVER(8MB PSRAM). It is programmed with MicroPython by default, users can begin the MicroPython developing as getting then on hand.
3. DS18B20 Temperature Sensor
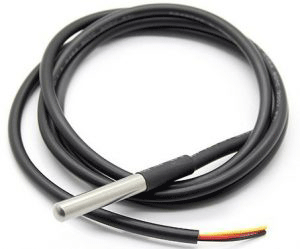
DS18B20 is a pre-wired and waterproofed version of the DS18B20 sensor. It is handy for use when you need to measure something far away, or in wet conditions. The Sensor can measure the temperature between -55 to 125°C (-67°F to +257°F). The cable is jacketed in PVC. Check the datasheet here: DS18B20 Sensor Datasheet.
Since it is digital, there is no signal degradation even over long distances. These 1-wire digital temperature sensors are fairly precise, i.e ±0.5°C over much of the range. It can give up to 12 bits of precision from the onboard digital-to-analog converter. They work great with any microcontroller using a single digital pin.

4. OLED Display
This SSD1306/SSD1315 is a 0.96/1.3 inch blue OLED display module. The display module can be interfaced with any microcontroller using SPI/IIC protocols. It is having a resolution of 128x64. The package includes display board, display,4 pin male header pre-soldered to board.

We will display the temperature reading on this display. To learn more about the interfacing of OLED Display with ESP32 using MicroPython, follow this guide: Interfacing 0.96″ OLED Display with ESP32 using MicroPython.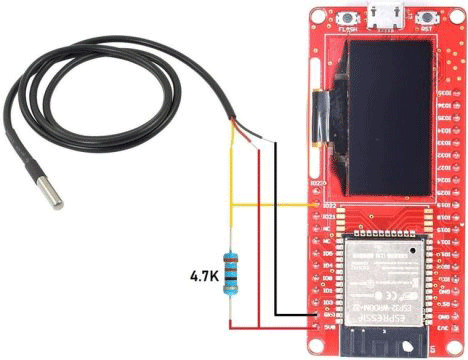

We will display the temperature reading on this display. To learn more about the interfacing of OLED Display with ESP32 using MicroPython, follow this guide: Interfacing 0.96″ OLED Display with ESP32 using MicroPython.
5. Interfacing DS18B20 Temperature Sensor with ESP32 using MicroPython
5.1 Circuit Diagram & Connections
Here is a circuit diagram for Interfacing DS18B20 Temperature Sensor with ESP32 using MicroPython Code. The digital output pin is connected to ESP32 GPIO22 Pin. A 4.7K resistor is used as a pull-up resistor & is connected between digital output pin & VCC pin.

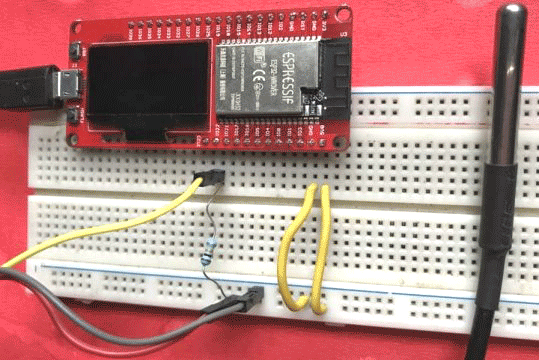
In case if you are using MakePython ESP32 Board, you can do the following connection as shown in the connection diagram below. This board has an additional 1.3″ OLED Display.

In case if you are using MakePython ESP32 Board, you can do the following connection as shown in the connection diagram below. This board has an additional 1.3″ OLED Display.

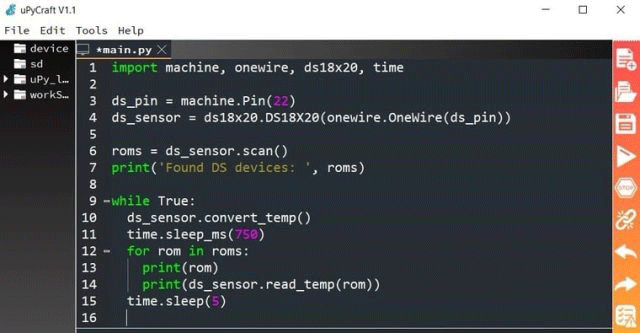
5.2 MicroPython Source Code
The MicroPython Code is given below. Using this MicroPython Code you can Interface DS18B20 with ESP32 Board & check the output in uPyCraft IDE Python Shell.
Just copy the code below and create a new file in uPyCraft IDE & save it with a name "main.py".
To upload the code use the "Download & Run" button in uPyCraft IDE. As soon as the code is uploaded, the shell window will start showing the temperature.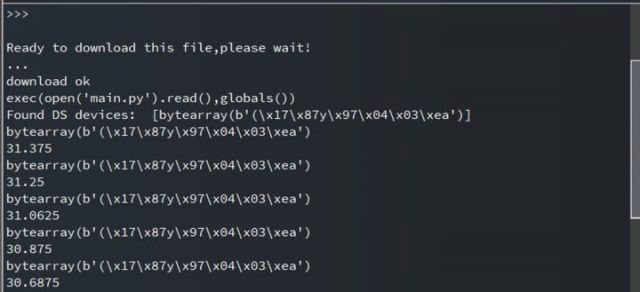
If you are using "MakePython ESP32 Board" the 1.3" OLED Display I2C Pins are connected to GPIO5 (SDA) & GPIO4 (SCL) of OLED Display. You need to modify the code on the basis of I2C Pins if you are using any other ESP32 Board.
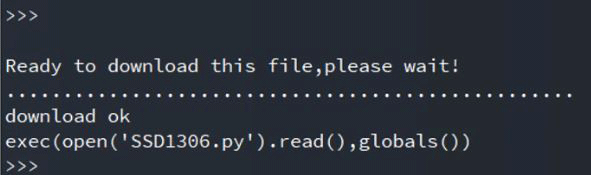
First, open a new file in uPyCraft IDE paste the above code. Save the file as a name "SSD1306.py". Click the "Download & Run" Icon. This will upload the file to the ESP32 board.
The uPyCraft console window showing the following message:
Now you can import the SSD1306 library and use it on the code part.
Note: Please change the OLED Pin in the code according to the I2C pins of your ESP32 board.
If you have any further questions,or have special requirement based on those MakePython IoT boards, feel free to contact service@makerfabs.com.
This article is originally posted on How2electronics.
You can also learn from this video tutorial made by How2electronics:

import machine, onewire, ds18x20, time

ds_pin = machine.Pin(22)
ds_sensor = ds18x20.DS18X20(onewire.OneWire(ds_pin))

roms = ds_sensor.scan()
print('Found DS devices: ', roms)

while True:
  ds_sensor.convert_temp()
  time.sleep_ms(750)
  for rom in roms:
    print(rom)
    print(ds_sensor.read_temp(rom))
  time.sleep(5)
To upload the code use the "Download & Run" button in uPyCraft IDE. As soon as the code is uploaded, the shell window will start showing the temperature.

6. Interfacing DS18B20 with ESP32 & OLED Display using MicroPython
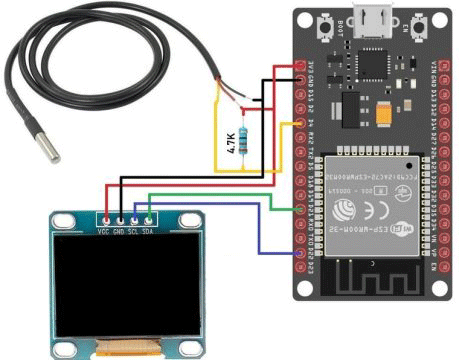
6.1 Circuit Diagram & Connections
Here is a circuit diagram for Interfacing DS18B20 Temperature Sensor & OLED Display with ESP32 using MicroPython Code. The digital output pin is connected to ESP32 GPIO22 Pin. A 4.7K resistor is used as a pull-up resistor & is connected between digital output pin & VCC Pin. The 0.96″ I2C OLED Display SDA & SCL Pin is connected to GPIO21 (SCL) & GPIO22 (SDA) of ESP32 respectively.

If you are using "MakePython ESP32 Board" the 1.3" OLED Display I2C Pins are connected to GPIO5 (SDA) & GPIO4 (SCL) of OLED Display. You need to modify the code on the basis of I2C Pins if you are using any other ESP32 Board.
I am using MakePython ESP32 Board. So my connection diagram is given below.

6.2 SSD1306 Library
The library to write to the OLED display isn’t part of the standard MicroPython library by default. So, first, we need to upload the library to the ESP32 board.
# MicroPython SSD1306 OLED driver, I2C and SPI interfaces
from micropython import const
import time
import framebuf
import sys

currentBoard=""
if(sys.platform=="esp8266"):
  currentBoard="esp8266"
elif(sys.platform=="esp32"):
  currentBoard="esp32"
elif(sys.platform=="pyboard"):
  currentBoard="pyboard"
  import pyb
# register definitions
SET_CONTRAST        = const(0x81)
SET_ENTIRE_ON       = const(0xa4)
SET_NORM_INV        = const(0xa6)
SET_DISP            = const(0xae)
SET_MEM_ADDR        = const(0x20)
SET_COL_ADDR        = const(0x21)
SET_PAGE_ADDR       = const(0x22)
SET_DISP_START_LINE = const(0x40)
SET_SEG_REMAP       = const(0xa0)
SET_MUX_RATIO       = const(0xa8)
SET_COM_OUT_DIR     = const(0xc0)
SET_DISP_OFFSET     = const(0xd3)
SET_COM_PIN_CFG     = const(0xda)
SET_DISP_CLK_DIV    = const(0xd5)
SET_PRECHARGE       = const(0xd9)
SET_VCOM_DESEL      = const(0xdb)
SET_CHARGE_PUMP     = const(0x8d)
class SSD1306:
  def __init__(self, width, height, external_vcc):
    self.width = width
    self.height = height
    self.external_vcc = external_vcc
    self.pages = self.height // 8
    self.buffer = bytearray(self.pages * self.width)
    self.framebuf = framebuf.FrameBuffer(self.buffer, self.width, self.height, framebuf.MVLSB)
    self.poweron()
    self.init_display()
  def init_display(self):
    for cmd in (
      SET_DISP | 0x00, # off
      # address setting
      SET_MEM_ADDR, 0x00, # horizontal
      # resolution and layout
      SET_DISP_START_LINE | 0x00,
      SET_SEG_REMAP | 0x01, # column addr 127 mapped to SEG0
      SET_MUX_RATIO, self.height - 1,
      SET_COM_OUT_DIR | 0x08, # scan from COM[N] to COM0
      SET_DISP_OFFSET, 0x00,
      SET_COM_PIN_CFG, 0x02 if self.height == 32 else 0x12,
      # timing and driving scheme
      SET_DISP_CLK_DIV, 0x80,
      SET_PRECHARGE, 0x22 if self.external_vcc else 0xf1,
      SET_VCOM_DESEL, 0x30, # 0.83*Vcc
      # display
      SET_CONTRAST, 0xff, # maximum
      SET_ENTIRE_ON, # output follows RAM contents
      SET_NORM_INV, # not inverted
      # charge pump
      SET_CHARGE_PUMP, 0x10 if self.external_vcc else 0x14,
      SET_DISP | 0x01): # on
      self.write_cmd(cmd)
    self.fill(0)
    self.show()
  def poweroff(self):
    self.write_cmd(SET_DISP | 0x00)
  def contrast(self, contrast):
    self.write_cmd(SET_CONTRAST)
    self.write_cmd(contrast)
  def invert(self, invert):
    self.write_cmd(SET_NORM_INV | (invert & 1))
  def show(self):
    x0 = 0
    x1 = self.width - 1
    if self.width == 64:
      # displays with width of 64 pixels are shifted by 32
      x0 += 32
      x1 += 32
    self.write_cmd(SET_COL_ADDR)
    self.write_cmd(x0)
    self.write_cmd(x1)
    self.write_cmd(SET_PAGE_ADDR)
    self.write_cmd(0)
    self.write_cmd(self.pages - 1)
    self.write_data(self.buffer)
  def fill(self, col):
    self.framebuf.fill(col)
  def pixel(self, x, y, col):
    self.framebuf.pixel(x, y, col)
  def scroll(self, dx, dy):
    self.framebuf.scroll(dx, dy)
  def text(self, string, x, y, col=1):
    self.framebuf.text(string, x, y, col)
  def hline(self, x, y, w, col):
    self.framebuf.hline(x, y, w, col)
  def vline(self, x, y, h, col):
    self.framebuf.vline(x, y, h, col)
  def line(self, x1, y1, x2, y2, col):
    self.framebuf.line(x1, y1, x2, y2, col)
  def rect(self, x, y, w, h, col):
    self.framebuf.rect(x, y, w, h, col)
  def fill_rect(self, x, y, w, h, col):
    self.framebuf.fill_rect(x, y, w, h, col)
  def blit(self, fbuf, x, y):
    self.framebuf.blit(fbuf, x, y)

class SSD1306_I2C(SSD1306):
  def __init__(self, width, height, i2c, addr=0x3c, external_vcc=False):
    self.i2c = i2c
    self.addr = addr
    self.temp = bytearray(2)
    super().__init__(width, height, external_vcc)
  def write_cmd(self, cmd):
    self.temp[0] = 0x80 # Co=1, D/C#=0
    self.temp[1] = cmd
    #IF SYS  :
    global currentBoard
    if currentBoard=="esp8266" or currentBoard=="esp32":
      self.i2c.writeto(self.addr, self.temp)
    elif currentBoard=="pyboard":
      self.i2c.send(self.temp,self.addr)
    #ELSE:

  def write_data(self, buf):
    self.temp[0] = self.addr << 1
    self.temp[1] = 0x40 # Co=0, D/C#=1
    global currentBoard
    if currentBoard=="esp8266" or currentBoard=="esp32":
      self.i2c.start()
      self.i2c.write(self.temp)
      self.i2c.write(buf)
      self.i2c.stop()
    elif currentBoard=="pyboard":
      #self.i2c.send(self.temp,self.addr)
      #self.i2c.send(buf,self.addr)
      self.i2c.mem_write(buf,self.addr,0x40)
  def poweron(self):
    pass

class SSD1306_SPI(SSD1306):
  def __init__(self, width, height, spi, dc, res, cs, external_vcc=False):
    self.rate = 10 * 1024 * 1024
    dc.init(dc.OUT, value=0)
    res.init(res.OUT, value=0)
    cs.init(cs.OUT, value=1)
    self.spi = spi
    self.dc = dc
    self.res = res
    self.cs = cs
    super().__init__(width, height, external_vcc)
  def write_cmd(self, cmd):
    global currentBoard
    if currentBoard=="esp8266" or currentBoard=="esp32":
      self.spi.init(baudrate=self.rate, polarity=0, phase=0)
    elif currentBoard=="pyboard":
      self.spi.init(mode = pyb.SPI.MASTER,baudrate=self.rate, polarity=0, phase=0)
    self.cs.high()
    self.dc.low()
    self.cs.low()
    global currentBoard
    if currentBoard=="esp8266" or currentBoard=="esp32":
      self.spi.write(bytearray([cmd]))
    elif currentBoard=="pyboard":
      self.spi.send(bytearray([cmd]))
    self.cs.high()
  def write_data(self, buf):
    global currentBoard
    if currentBoard=="esp8266" or currentBoard=="esp32":
      self.spi.init(baudrate=self.rate, polarity=0, phase=0)
    elif currentBoard=="pyboard":
      self.spi.init(mode = pyb.SPI.MASTER,baudrate=self.rate, polarity=0, phase=0)
    self.cs.high()
    self.dc.high()
    self.cs.low()
    global currentBoard
    if currentBoard=="esp8266" or currentBoard=="esp32":
      self.spi.write(buf)
    elif currentBoard=="pyboard":
      self.spi.send(buf)
    self.cs.high()
  def poweron(self):
    self.res.high()
    time.sleep_ms(1)
    self.res.low()
    time.sleep_ms(10)
    self.res.high()
First, open a new file in uPyCraft IDE paste the above code. Save the file as a name "SSD1306.py". Click the "Download & Run" Icon. This will upload the file to the ESP32 board.

Now you can import the SSD1306 library and use it on the code part.
6.3 Main Code
After downloading the SSD1306.py file to the ESP32 Board, you can now upload the main code. To do that open another file and paste the below code. Save it as a name "main.py".
from machine import Pin,I2C
import ssd1306
import time
import machine
import onewire

dat = machine.Pin(22)       # the device is on GPIO0
i2c = I2C(scl=Pin(5), sda=Pin(4), freq=100000)      #Init i2c
lcd=ssd1306.SSD1306_I2C(128,64,i2c)           #create LCD object,Specify col and row

ds = ds18x20.DS18X20(onewire.OneWire(dat))     # create the onewire object
roms = ds.scan()            # scan for devices on the bus

try:
  while True:
      ds.convert_temp()
      time.sleep_ms(750)    #The reading temperature needs at least 750ms
      for rom in roms:
          lcd.fill(0)
          lcd.text("Temperature:",10,16)
          lcd.text(str(ds.read_temp(rom)),24,40)
          lcd.show()
except KeyboardInterrupt:
          pass
Note: Please change the OLED Pin in the code according to the I2C pins of your ESP32 board.
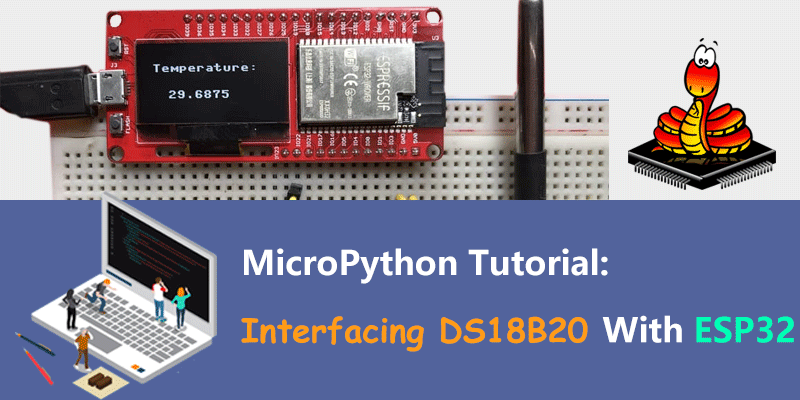
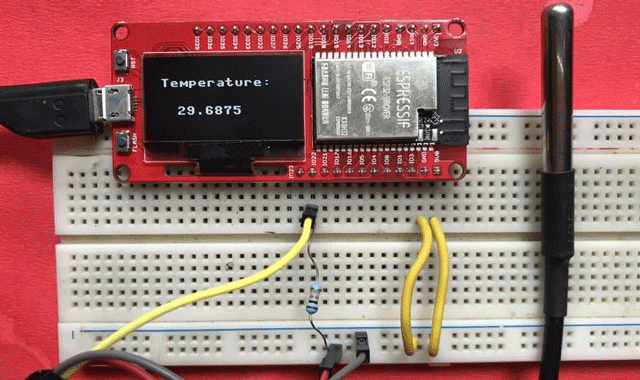
As soon as the code is uploaded, the OLED display will start displaying the temperature as shown in the photo below.

If you have any further questions,or have special requirement based on those MakePython IoT boards, feel free to contact service@makerfabs.com.
This article is originally posted on How2electronics.
You can also learn from this video tutorial made by How2electronics: